-
Dorchies David authored
- remove useless test of class compatibility in SeriesAggreg methods
- Change R compatibility to R >= 3.1.0 because of anyNA

Refs #41
c27f77f5

Developers documentation
#
#
#
Introduction
Pamhyr2 is free and open source software (FOSS) graphical user interface (GUI) for 1D hydro-sedimentary modelling of rivers developed in Python (with version 3.8). It use PyQt at version 5 and matplotlib in version 3.4.1 or later for the user insterface (see {{{file(/requirements.txt)}}} for details). The architecture of project code follow the Qt Model/View architecture [fn:qt-arch] (see details in section Architecture). Pamhyr2 packages can be build manually (see section Building packages), but there are automatically build with the gitlab-ci (see the section <a href=”Setup the CI environment”>Setup the CI environment). Documentation files are written with org-mode[fn:org], let see section Documentation files. Finally, to see the contribution rules, see the section How to contribute?.
[fn:qt-arch] Qt Model/View documentation: https://doc.qt.io/qt-5/model-view-programming.html (last access 2023-09-15) [fn:org] The org-mode website: https://orgmode.org/ (last access 2023-09-15)
Architecture
Pamhyr2’s architecture is based on Qt Model/View, see Figure graph-architecture. It is made up of several different components: the model (in blue), the graphical components (in red), the actions/delegates (in green), the commands (in purple), the solvers (in yellow) and the save file (in grey).
The model is a set of python classes and can be exported to a single SQLite3 format backup file. The view can be made up of various components, generally a Qt window with other view components, such as: a table, a text box, a button, a plot, and so on. The user can view the data using the view and interact with certain components. These components are linked to an action (such as a Python function) or to a delegate class. These actions or delegate can create a command (based on Qt UndoCommand class), this command must implement two functions: One to modify the model, one to reverte this modification and reset the model to previous state. All model modification must be perform by a command to be cancelled. The user can also run a solver and add some simulation results to model data.
digraph {
      bgcolor="transparent";
      node[colorscheme=set19,shape=box,style="filled",fillcolor=white];

      save[label="Pamhyr save",fillcolor="9",shape=note];
      model[label="Model",fillcolor="2"];
      view[label="View",fillcolor="1"];
      delegate[label="Delegate",fillcolor="3"];
      action[label="Action",fillcolor="3"];
      solver[label="Solver",fillcolor="6"];
      undocommand[label="Command",fillcolor="4"];
      user[label="User",shape=ellipse];

      model -> save[label="Save"];
      save -> model[label="Load"];

      model -> view[label="Rendering"];
      view -> delegate[label="Rendering"];
      delegate -> undocommand[label="Create"];
      action -> undocommand[label="Create"];
      action -> solver[label="Run"];
      solver -> model[label="Add results"];
      undocommand -> model[label="Modify"];

      view -> user[label="Vizualize"];
      user -> delegate[label="Modify"];
      user -> action[label="Activate"];
}
All the model source code are in the directory {{{file(src/Model)}}} (let see section Model for more details), the View components, delegate and command are in {{{file(src/View)}}} (see section View). Solvers classes are in {{{file(src/Solver)}}} (see section Solver).
[fn:qt-mv] The Qt Model/View documentation web page: https://doc.qt.io/qt-5/model-view-programming.html
Model
The model is a set of Python classes. In Pamhyr2, this classes must
respect some constraint. Each model class must inherits
Model.Tools.SQLSubModel abstract class, except the Model.Study
class who inherits Model.Tools.SQLModel (see SQL).
The model entry point is the Study class. It contains infomation about
the study: their name, description, time system, and so on. Their
contains a River object too. This river object inherits the network
graph and contains a list of RiverNode and a list of RiverReach
(an edge who contains a source node, and destination node).
RiverReach contrains geometry, so, the river network (node and edge)
associated with the geometry forms the basis of the model, and the
other components are linked to one of these basic components.
digraph {
    bgcolor="transparent";
    node[colorscheme=set19,shape=box,style="filled",fillcolor="2"];

    subgraph cluster0 {
        style=dashed;
        study[label="Study"];
        river[label="River"];

        subgraph cluster00 {
            style=solid;
            label="Network"
            rnode[label="RiverNode"];
            redge[label="RiverReach"];
        }

        subgraph cluster06 {
            style=solid;
            label="Greometry"
            georeach[label="Reach"];
            geocrosssection[label="Cross-section"];
            geopoint[label="Point"];
        }
    }

    //subgraph cluster1 {
    //    style=dashed;
        frictionlist[label="FrictionList"];

        subgraph cluster01 {
            style=solid;
            label="Stricklers";
            stricklers[label="Stricklers"];
            stricklerslist[label="StricklersList"];
        }
        subgraph cluster02 {
            style=solid;
            label="BoundaryCondition";
            boundaryconditionlist[label="BoundaryConditionList"];
            boundarycondition[label="BoundaryCondition"];
        }
        subgraph cluster03 {
            style=solid;
            label="LateralContribution";
            lateralcontributionlist[label="LateralContributionList"];
            lateralcontribution[label="LateralContribution"];
        }
        subgraph cluster04 {
            style=solid;
            label="InitialConditions";
            initialconditionsdict[label="InitialConditionsDict"];
            initialconditions[label="InitialConditions"];
        }

        solverparameterslist[label="SolverParametersList"];

        subgraph cluster05 {
            style=solid;
            label="Sediment";
            sedimentlayerlist[label="SedimentLayerList"];
            sedimentlayer[label="SedimentLayer"];
            layer[label="Layer"];
        }
    //}

    subgraph cluster2 {
        style=dashed;
        label="Results"
        results[label="Results"]
        rriver[label="River"];
        rreach[label="Reach"];
        rcrosssection[label="Cross-section"];
    }

    study -> river;
    river -> rnode;
    river -> redge;
    redge -> rnode;
    river -> boundaryconditionlist -> boundarycondition -> rnode;
    river -> lateralcontributionlist -> lateralcontribution -> redge;
    river -> initialconditionsdict -> initialconditions;
    initialconditions -> redge;
    river -> stricklerslist -> stricklers;
    river -> solverparameterslist;
    river -> sedimentlayerlist -> sedimentlayer -> layer;
    redge -> frictionlist -> stricklers;
    redge -> georeach -> geocrosssection -> geopoint;
    geocrosssection -> sedimentlayer;
    geopoint -> sedimentlayer;

    results -> study;
    results -> rriver;
    rriver -> river;
    rriver -> rreach;
    rreach -> georeach;
    rreach -> rcrosssection;
    rcrosssection -> geocrosssection;
}
SQL
The model must be export to a database file to create a study save
file. This file use SQLite3[fn:sqlite] format and the extention
.pamhyr. So, each model componante must be register into this study
file. To create, update, set and get information into SQLite database
we use SQL command. The database use version number and some
modification could be perform to update database. For each model
componante, correspond one or more SQL table to store information. To
normalize the interaction with database we made two classes, SQLModel
and SQLSubModel. The Study class use SQLModel because is the top of
the model hierachy. The rest of model class inherits to SQLSubModel.
A class who inherits SQLSubModel, must implement some methods:
-
_sql_create: Class method to create the database scheme -
_sql_update: Class method to update the database scheme if necessary -
_sql_load: Class method to load data from DB -
_sql_save: Method to save current object into DB
Class method take in arguments: The class (cls), a function to
execute SQL command into the database (execute). In addition, the
update method take the previous version of database, load method take
an optional arguments data if additional infomation ar needed, and
who can contains whatever you want. The method save take in arguments
the current object (self), a function to execute SQL command into
the database (execute), and optional data (data).
The class who inherits SQLSubModel can also define an class attribute
_sub_classes to set a formal class dependencies into database. This
attribute is use at database creation to create all table, and at
update to update all the database table. Let see examples of
SQLSubModel usage for two classes Foo and Bar with Foo contains list
of Bar (Listing sql-bar and sql-foo).
from Model.Tools.PamhyrDB import SQLSubModel

class Bar(SQLSubModel):
    _id_cnt = 0
    def __init__(self, id = -1, x = 0, y = 0):
        self._x = x
        self._y = y
        if id == -1:
            self.id = Bar._id_cnt + 1
        else:
            self.id = id
        Bar._id_cnt = max(id, Bar._id_cnt+1)

    @classmethod
    def _sql_create(cls, execute):
        execute("""
          CREATE TABLE bar (
            id INTEGER NOT NULL PRIMARY KEY,
            x INTEGER NOT NULL,
            foo_id INTEGER NOT NULL,
            FOREIGN KEY(foo_id) REFERENCES foo(id),
          )""")
        return True

    @classmethod
    def _sql_update(cls, execute, version):
        # If version is lesser than 0.0.2, add column to bar table
        major, minor, release = version.strip().split(".")
        if major == minor == "0":
            if int(release) < 2:
                execute("ALTER TABLE bar ADD COLUMN y INTEGER")
        return True

    @classmethod
    def _sql_load(cls, execute, data = None):
        new = []
        table = execute(
            f"SELECT id, x, y FROM bar WHERE foo_id = {data['id']}"
        )
        for row in table:
            bar = cls(
                id = row[0], x = row[1], y = row[2],
            )
            new.append(bar)
        return new

    def _sql_save(self, execute, data = None):
        execute("INSERT INTO bar (id,x,y,foo_id) VALUES " +
                f"({self.id}, {self._x}, {self._y}, {data['id']})")
class Foo(SQLSubModel):
    _id_cnt = 0
    _sub_classes = [Bar]

    def __init__(self, id = -1, name = ""):
        self._name = name
        self._bar = []
        # ...

    @classmethod
    def _sql_create(cls, execute):
        execute("""
          CREATE TABLE foo (
            id INTEGER NOT NULL PRIMARY KEY,
            name TEXT NOT NULL,
          )
        """)
        return cls._create_submodel(execute)

    @classmethod
    def _sql_update(cls, excute, version):
        return cls._update_submodel(execute, version)

    @classmethod
    def _sql_load(cls, execute, data = None):
        new = []
        table = execute(
            "SELECT id, name FROM foo"
        )
        for row in table:
            foo = cls(
                id = row[0],
                name = row[1],
            )
            data = {
                "id": row[0],     # Current Foo ID
            }
            foo._bar = Bar._sql_load(execute, data=data)
            new.append(foo)
        return new

    def _sql_save(self, execute, data = None):
        execute(f"DELETE FROM foo WHERE id = {self.id}")
        execute(f"DELETE FROM bar WHERE foo_id = {self.id}")
        # Save new data
        execute(f"INSERT INTO bar (id,name) VALUES ({self.id}, {self._name})")
        data = {"id": self.id}
        for bar in self._bar:
            bar._sql_save(execute, data=data)
[fn:sqlite] The SQLite web site: https://www.sqlite.org/index.html (last access 2023-09-20)
List class
Dict class
View
UI file
Translate
Window
UndoCommand
Table
Plot
Mainwindow
Solver
digraph {
      bgcolor="transparent";
      node[colorscheme=set19,shape=box,style="filled",fillcolor=9];

      subgraph cluster0 {
          label="Pamhyr2"
          config[label="Config",fillcolor=5];
          model[label="Model",fillcolor=2];
          obj[label="Solver",fillcolor=6];
          results[label="Results",fillcolor=2];
          view[label="View",fillcolor=1];

          results -> model[style="dashed"];
          results -> obj[style="dashed"];
      }

      config -> obj[label=""];
      obj -> model[style="dashed"];

      subgraph cluster1{
          label="System";
          in[label="Solver input files",shape=note];
          out[label="Solver output files",shape=note];
          bin[label="Solver binary",shape=note];
      }

      obj -> in[label="Write (1)"];
      obj -> bin[label="Execute (2)"];
      bin -> in[label="Read (2.1)"];
      bin -> out[label="Write (2.2)"];
      obj -> results[label="Create (3)"];
      obj -> out[label="Read (3.1)"];
      view -> model[style="dashed"];
      view -> results[style="dashed"];
}
Unit tests
The debug mode
Build the project
The project uses gitlab-ci runners to build packages, but it is possible to build packages manually.
Building packages
If you need an hand made package, you can script available in {{{file(packages)}}} directory.
GNU/Linux
On GNU/Linux building GNU/Linux packages is easy, you just need python in version 3.8 must be installed with venv and pyinstaller packages (see Listing linux-env-deb for Debian and derived system). Finally, run the {{{file(linux.sh)}}} script (see Listing linux-pkg).
sudo apt install python3.8
python3 -m pip install venv
python3 -m pip install pyinstaller
cd packages
./linux.sh
Windows
To make the Windows packages you have two choice: If you use Windows you can use the script {{{file(packages/windows.bat)}}}, other else you can use the script {{{file(packages/wine.sh)}}}. Each script need a specific software environment.
On windows, you needs python on version 3.8, pyinstaller and NSIS[fn:nsis] installed. On GNU/Linux you need wget, wine and winetricks installed.
[fn:nsis] The NSIS web site: https://sourceforge.net/projects/nsis/
Setup the CI environment
Documentation files
This document and the user documentation are org files. This text file format is formatted so that it can be exported in different formats: PDF (with latex), ODT, HTML, etc. It was originally designed for the GNUEmacs[fn:emacs] text editor, but can be edited with any text editor. Here we take a look at the different features used in these documents.
[fn:org] The org-mode website: https://orgmode.org/ (last access 2023-09-15) [fn:emacs] The GNUEmacs project website: https://gnu.org/s/emacs/ (last access 2023-09-15)
Org-mode
Document structure
Org uses the * character to define a new document section. To add a
sub-section, you can add an additional * to the current section[fn::
See document structure documentation:
https://orgmode.org/org.html#Headlines (last access 2023-09-15)].
* Top level headline
** Second level
*** Third level
    some text
*** Third level
    more text
* Another top level headline
Format
Org-mode is a markup file, using markup in the text to modify the appearance of a portion of text[fn:: See markup documentation: https://orgmode.org/org.html#Emphasis-and-Monospace (last access 2023-09-15)].
| Markup | Results |
|---|---|
*Bolt* |
Bolt |
/Italic/ |
Italic |
_underline_ |
underline |
| ==verbatim== | verbatim |
~code~ |
code |
+strike-through+ |
Source code blocks
You can add some code blocks[fn:: See org-mode documentation for source code: https://orgmode.org/org.html#Working-with-Source-Code (last access 2023-09-15)] in the document.
Here is an example for python source code:
#+CAPTION: Get os type name in Python code
import os

print(f"Document build on system: {os.name}")
If you use GNUEmacs, it is also possible to run the code inside a block and export (or not) the reuslts in the document.
import os

print(f"Document build on system: {os.name}")
Document build on system: posix
LaTeX
If we export the file to PDF, org-mode use {{{latex}}}. So we can add
some piece of {{{latex}}} into the document[fn:: See {{{latex}}} part
in documentation: https://orgmode.org/org.html#Embedded-LaTeX (last
access 2023-09-15)]. For exemple, we can add math formula like
$E=mc^2$ ($E=mc^2$) or \[E=mc^2\]:
\[E=mc^2\]
But we can also add every type of {{{latex}}}:
# Add latex in line
#+LATEX: <my line of latex>

# Add multiple line of LaTeX
<my latex here>
It is also possible to add specific {{{latex}}} file header with
#+LATEX_HEADER. In this document we use the file
{{{file(doc/tools/latex.org)}}} for all {{{latex}}} headers.
Macro
In this document, we use a few macros[fn:: See marcos documentation
https://orgmode.org/org.html#Macro-Replacement (last access
2023-09-15)] to simplify writing. They allow you to define sequences
of text to be replaced, so that the macro name is replaced by its
value. They are defined in the {{{file(doc/tools/macro.org)}}}
file. Once defined, they can be used in the document as follows:
{{{<macro-name>}}}. You can also have macros with arguments, in this
case: {{{<macro-name>(arg1,...)}}}. Les macros peuvent aussi
utiliser du code emacs-lisp.
# Exemple of macro définition

#+MACRO: toto               tata
#+MACRO: add                \(($1 + $2)\)
#+MACRO: emacs-version      (eval (nth 2 (split-string (emacs-version))))
Macro apply:
- Marco
{{{toto}}}: {{{toto}}} - Marco
{{{add(x,y)}}}: {{{add(x,y)}}} - Marco
{{{emacs-version}}}: {{{emacs-version}}}
Footnotes
Footnote in org-mode is define with marker =[fn:…]=[fn:: Create footnotes in org-mode documentation https://orgmode.org/org.html#Creating-Footnotes (last access 2023-09-15)]:
The Org website[fn:1] now looks a lot better than it used to.
...
[fn:1] The link is: https://orgmode.org
or:
The Org website[fn:: The link is: https://orgmode.org] now looks
a lot better than it used to.
...
References
The references use the {{{latex}}} bibtex tools. The bib file is in
{{{file(/doc/tools/ref.bib)}}} and use for developers and user
documentation. In document, use {{{cite(<name>)}}} to cite a paper.
Export
To export the files, a {{{file(build.sh)}}} script is available in the org
files directories. On GNU/Linux system you can build the documentation
PDF file with the command ./build.sh. Texlive package must be
installed, you can install only needed packages or all texlive
packages, for example on Debian (and some derived system) use command
Listing texlive-install.
sudo apt install texlive-full
Some org-mode configuration used in documentations files are define in
/doc/tools/:
- {{{file(PamhyrDoc.cls)}}}: The {{{latex}}} document class
- {{{file(macro.org)}}}: Available macro
- {{{file(latex.org)}}}: {{{latex}}} configutation for documentations files
- {{{file(setup.el)}}}: GNUEmacs configuration to build documentations
- {{{file(ref.bib)}}}: Bibtex files for documentations files
How to contribute?
Pamhyr2 is free software: you can redistribute it and/or modify it under the terms of the GNU General Public License[fn:license], either version 3 of the License, or any later version.
[fn:license] The GPLv3 web page: https://www.gnu.org/licenses/gpl-3.0.en.html
Guidelines
To contribute to Pamhyr2, we expect a minimum of respect between contributors. We therefore ask you to respect the following rules regarding communication and contribution content:
- No gender, racial, religious or social discrimination
- No insults, personal attacks or potentially offensive remarks
- Pamhyr2 is free software, and intended to remain so, so take care with the licensing of libraries and external content you want to add to the project
- Humour or hidden easter eggs are welcome if they respect the previous rules
Make a contribution
There are several ways to contribute: you can report a bug by creating an issue on the project’s gitlab page[fn:p2-gitlab], or you can create a merge request on the same page with the changes you have made to the code, translation or documentation.
The Pamhyr2 copyright is owned by INRAE[fn:inrae], but we keep a record of each contributors. If you made a modification to pamhyr2 software, please add your name at the end of {{{file(AUTHORS)}}} file and respect the Listing auth-format format. You can update this file information for following contribution.
<first name> <last name> [(optional) email], <organisation>, <years>
[fn:p2-gitlab] The Pamhyr2 Gitlab project page: https://gitlab.irstea.fr/theophile.terraz/pamhyr [fn:inrae] The INRAE web site: https://www.inrae.fr/
Translate
You can improve or add translation for the project. To contribute to Pamhyr2 translate, you need to use Qt Linguist[fn:qt-linguist]. Open Qt-linguist and edite the translation ({{{file(.ts)}}}) file, finally, commit the new version of file and make a merge request.
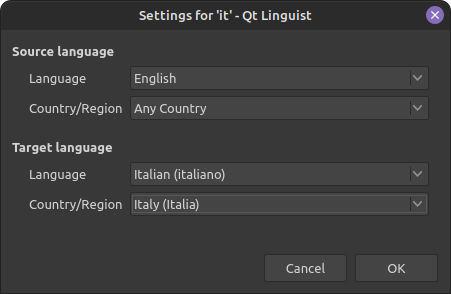
If you want add a new language, edit the script {{{file(src/lang/create_ts.sh)}}} like Listing ts-it. Run the script and open the new file with Qt-linguist, setup target language (Figure qt-linguist-setup) and complete translation. Finally, commit the new file and make a merge request.
...
LANG="fr it"
...
[fn:qt-linguist] The Qt linguist documentation web page: https://doc.qt.io/qt-5/qtlinguist-index.html (last access 2023-09-18)
Code contribution
If you are developper you can improve and/or add features to Pamhyr2. Please, follow the architecture described in section Architecture as closely as possible. Keep the code simple, clear and efficient as possible. The master branch is reserved for the project maintainer; you can create a new branch or fork the project before the request.
{{{biblio}}}